Our eyes cry out for images. Images grab us, connect us, and tell us the real story. We see color before words, faces and light before that. Vision is central to our understanding and growth.
In a classroom, images provide ways to dig inside our brains and find nuance, sometimes beyond the subtleties even the richest English vocabulary can conjure. Lynell Burmark provides the concise research substantiation for including the visual in everything we teach in her blog post “Teaching Students, Not Just Standards, With Visual Literacy.” And I wholeheartedly agree with her. But I also know many teachers who have never experienced things visually because they personally are highly verbal and simply learn well from print. Perhaps their own visual school experience was limited to the emergency evacuation map and classroom rules, laminated in perpetual faded form. To meet the requirements of the administration or suggestions of teacher ed programs, these visually starved teachers hang a few things on bulletin boards “for the visual kids” and call it done. In their defense, they may not “see” the need for anything more. This is where they can call upon their students to help, and this may be the easiest first foray into creating a learning community that moves away from a teacher-expert to a shared learning model.
How do I do this, you ask?
Ideally, you would completely change how you present the unit, but let’s keep it simpler for you this first time. Teach the lessons much as you have before (I can’t believe I am saying this), but shift them enough that you can take time each day to Create a Vision. Perhaps instead of one of the quizzes, you can “get a grade” from students by their contributions to the Vision. Here is a brainstormed step-by-step. I hope others will comment with steps and ideas, too.
1. Be honest. Tell the kids what you are doing: This unit we are going to Create a Vision together as we learn.
2. Strip the bulletin boards and start fresh.
3. Open the cupboards where you have any old art materials, and turn the classroom computer (if you only have one) so it is a walk-up station facing the kids, maybe at the side of the room so you can see what they are doing.
4. Beg, borrow, or buy a new printer cartridge for sharing paper-based Visions created on the computer.
5. Beg, borrow, or plead for a projector to connect to the computer for sharing electronic Visions.
6. As you teach, have students create a Vision of what they learned. This can happen every day or two in class. With very young students, show them how first. It can be as simple as selecting an image from Google Images or from CompFight (reviewed here – for images without copyright concerns!) that “explains” what we learned today and helps us remember it or as detailed as a concept map (both visual and verbal) or as creative as a “poster.” Those who like to draw or create collages can use paper, but t does not have the lasting portability of an electronic vision. There are tons of free, online tool options. Here are just some of those we have reviewed on TeachersFirst.
My favorite ones (lately):
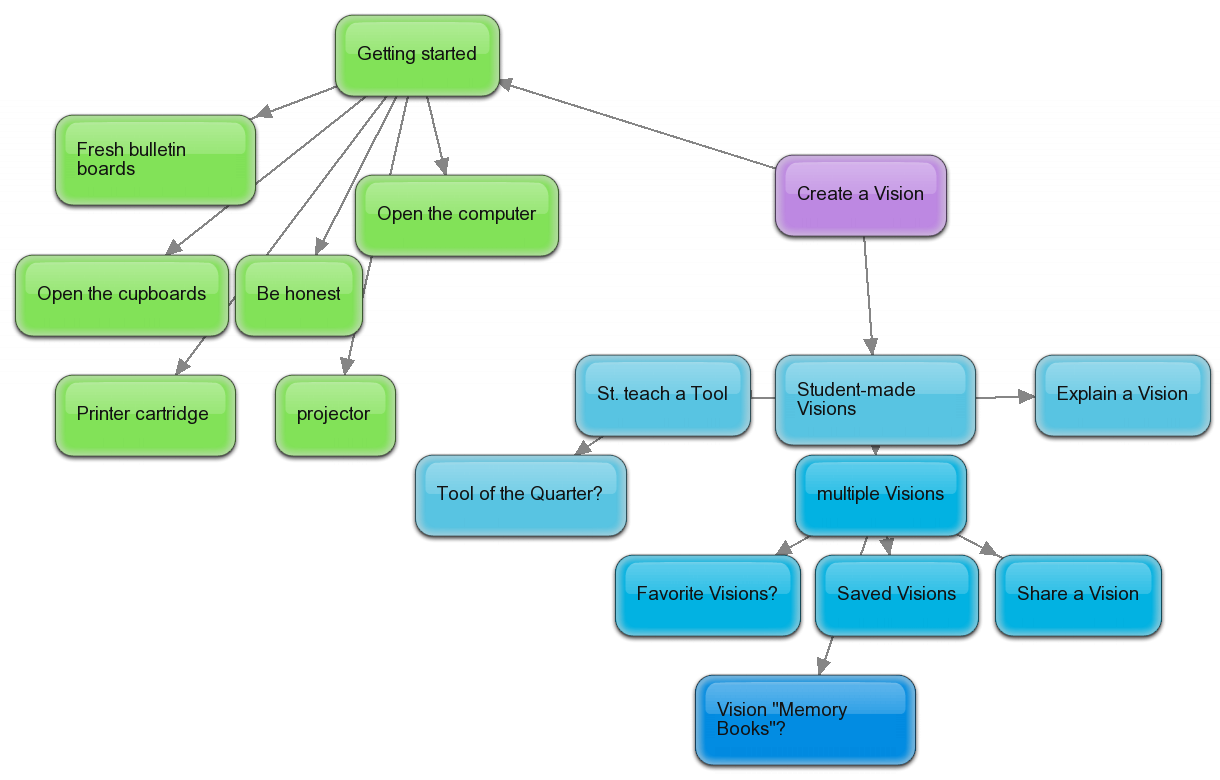
Bubbl.us – reviewed here and with an example below. Concept maps/grphic organizers made by YOU- can be shared, done collaboratively, and ADDED to or changed as the unit progresses– revisiting the vision!
Glogster EDU- reviewed here. Online tool to make electronic (or printable) “posters.” Can have all the glitz and trashy look of a preteen jewlry store. Certain to appeal both to students who have not yet developed visual “taste” and those who HAVE.
Diagrammr- reviewed here– no membership needed, very quick, but does not save for return visits
Voicethread- reviewed here– images with narration!
Any comic creation tool: (there are many more–search Teachersfirst for comic and tool)
GoAnimate-reviewed here
Bubblr- reviewed here
Pixton- reviewed here
Other electronic/printable poster makers/ tools for adding text to images:
Automotivator -reviewed here
Captioner- reviewed here
BigHugeLabs Magazine Cover Maker- reviewed here
PicLits- reviewed here
Scrapblog -reviewed here (makes a scrapbook more than a poster)
7. Extend the vision by sharing and revisiting it. Post the student-made visions; put them on the projector as students com in the next day; have students explain them; let others add to them and correct them; rate them; give students stars to mark Favorite visions (even on the bulleting board). Essentially PLASTER the room and your class’ experience with visions. Ask students to make a “memory book” of visions from the school year (paper or electronic) and email it to themselves or save it for posterity. You will be amazed what they feature as highlights of their learning.
———–
To practice what I preach, here is a concept map for this blog post “lesson,” created with bubbl.us. (I would embed it here, but we need to upgrade WordPress MU to be able to do so….another story…). You can interact more fully with the map here. (I can’t give you access to change it without making you a “friend” on bubbl.us). Click to see the full map! Are you getting the vision?

 I admire someone who is willing to change his/her mind. I don’t mean fickleness. I mean changing one’s mind as in thinking deeply, allowing ideas to steep and evolve, finally realizing that thoughtful deliberation has changed one’s intellectual travel plan. The New York Times today documents just such a “U-turn” by Diane Ravitch, educational historian and scholar. If I were giving a project-based learning grade to Dr. Ravitch, she would earn maximum points for process and extra credit for risk-taking. For a professional “scholar” to change her mind is the most risky and admirable way to model true learning we could ever hope to witness.


