November 14, 2014

The Lives of Maps

Filed under: edtech,Teaching and Learning — Candace Hackett Shively @ 9:02 am

Think back to the first time you can remember seeing or using a map. Depending on how old you are, that map may have been the paper-folding challenge type– printed with lines, symbols, and colors — or an app on a smart phone. Maps have always offered a symbolic way to show real places, but the Internet and GPS have added exploration into what “map” means. Today’s techno-mapped world lures us to explore far beyond the dusty map sections of a social studies or geography textbook. Those big paper road atlases with outdated information and tiny print you couldn’t read in the dimly lit back seat have mostly disappeared. The Earth and maps are ALIVE thanks to technology. Where is it? Ask Google Earth or Google Maps. How do I get there? Ask Siri or your in-car GPS. EMaps are so ubiquitous that we may forget how much they have reshaped our students’ concepts of a living “world” compared to what we may have experienced on paper.

Screen Shot 2014-11-12 at 12.00.51 PM
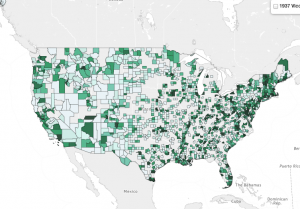
Three maps recently reviewed on TeachersFirst offer three very different “looks” at the world (or U.S.). One, Yale Photogrammar, organizes historic U.S. photographs. In this case, the “map” is actually the portal to see a “world” of the 1930s and 40s.  The map itself simply provides clickable “places” of reference for the photographs. It is a visual interface to access visual information. But is that really all? Like most eMaps, this one is zoomable and almost invites you to dive in. You ask whether houses or farms or people were different in Nebraska vs. California? Click to see. What about county to county in Pennsylvania? Click to see. This map is an endless set of windows into lives and times gone by.

Screen Shot 2014-11-12 at 12.01.17 PM
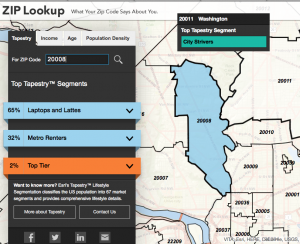
Esri’s Zip Lookup uses a map as the entry point into socio-economic groups, organized by mapped zip codes and described in terms of life style and values. See the make up of the people in a zip code. Who lives here? Comfortable Empty Nesters, Parks and Rec, Laptops and Lattes, Metro Renters? The map is a window into what people care about and spend their money on. We are tempted to ask, “Why here? What is it about this location that attracts this group?” The Zip Lookup map is an invitation to take an almost voyeuristic dive into people’s lives, based on where they live.

Screen Shot 2014-11-12 at 12.01.45 PM
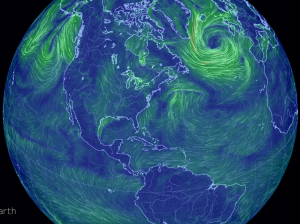
Earth Null School maps the winds on the Earth’s surface. Unlike the weather maps on TV, this globe is in your hands to turn and zoom, watching beautiful swirls that threaten to spin blizzards or floods. This map ignores humans entirely. It does not matter who lives there or what history happened there. The storms on this map don’t care. But we are drawn in to see the power of what may happen here tomorrow or what is closing the airport in Denver today. The Earth really is alive in this map.

If the only maps you have ever seen are eMaps, your view of the world is so much richer. If you teach map skills, share four maps with your students: one the folded paper type, and the other three eMaps listed here. Ask them what each map is GOOD for…what it makes them wonder. If they can answer those questions about each map, they have learned more about map skills than any lesson about keys and tropics. They have discovered the lives within maps.

October 16, 2014

Prep plus the Trifecta: A better plan for parent conferences

Filed under: edtech,Teaching and Learning — Candace Hackett Shively @ 9:05 am

Parent conferences can be confrontational, collaborative, or just plain boring:

  • show work samples
  • show grades
  • describe strengths
  • point out needs for improvement (often including organizational skills, work habits)
  • mention upcoming projects
  • where to find class web site
  • questions? (if you have 20 seconds left)
  • thank you

… repeat

If you have fallen into this routine, you may want to change it up to maximize the impact of  this face to face conference time. You have to prep for conferences anyway, so why not prepare a document that can be viewed more than once and by more than just you and the parent?

  • share work samples and grades in advance via your online grading program and/or email
  • describe strengths and point out needs for improvement in an online conference summary (think Google Doc?) that the parent can share WITH their child or teen. Include the link to this document in the email mentioned above. Better yet, have the student help to CREATE this document prior to conference day.
  • mention upcoming projects and include the link to your class web page ON the conference summary form
  • Add The Trifecta+ information below to your class web page prior to conference week. (You have my permission to copy/paste from here, as long as you give credit.)

You have just saved ten minutes of your 15. Now, when you meet face to face:

  • Ask if parents have questions about the information you shared in advance (5 min). If they have not read it (quite possible), start with the Trifecta+ and come back to the online conference summary at the end.
  • SHARE The Trifecta+ of organizational tools and work habit support so you can work together in support of their child/teen. They will appreciate the concrete help!


three
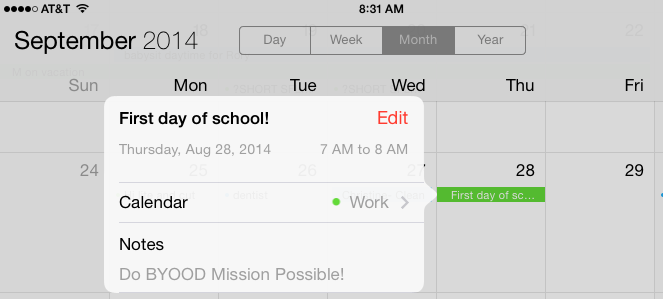
The Trifecta + is a set of three tools — and an optional fourth — that every family can use to manage home “study life.”

More importantly, encouraging students to find and use the tools that meet their individual needs (see above) will have a lasting impact on that young person’s life long after this elementary grade, English class, or Algebra I course.

Every student will need at least one of these at one time, and most need all of them most of the time:

  1. A timer like Timertab (review) or Teachit Timer (review)
  2. A can’t-lose-it list maker like  Strike (review) or Todoist (review)
  3. A sticky note tool like Primary Wall (review) or Lino (review)

1. A timer like Timertab (review) or Teachit Timer (review) Often, time available = time wasted. Show your child how you use a timer to manage time available. Do it for yourself so he/she can see how you organize your time. If you are not great at time management, admit it and learn together! Make it a game to predict how long a task or homework assignment will take and see if you can complete it in that time. Adjust your prediction the next day. Look at all available time (before soccer, after dinner, etc) to allocate time for each task on your list (see #2). The Timer Tab option i especially handy if you are trying to manage ONLINE time. You can see how you are doing just by glancing at the browser tab. Family bonus: this helps with arguments about which child gets to use the computer and for how long! TeachitTimer has audible alarms. (Yes, your teen could also use his/her smartphone timer.)

2. A can’t-lose-it list maker like  Strike (review) or Todoist (review) A list maker can be gratifying for those who enjoy saying “it’s done!” but can seem overwhelming to those who never make lists. Do this one together with your child/teen and admit it if you are not good at remembering all the things you need to do. Learn to make lists together! Key to this idea is having the list be accessible wherever you are. Online tools are perfect, especially if you can also use them on your smartphone. These tools require a free account, so create a FAMILY account so you — as a parent –can also see your child’s lists. Start by making lists of tonight’s homework and other to-do items. Don’t forget to include repacking the backpack, picking out clothes, and going to swim practice. Younger kids will enjoy checking things off. Older ones… well, offer an incentive for making and completing “good” lists. Is there a long term project coming up (the one the teacher mentioned at conferences)? Have your upper elementary to high school student make the list of steps required, adding self-selected due dates:

  • Purchase display board
  • complete research notes
  • write first draft
  • etc.

You may need to talk through this. Use an example from your own job or home tasks to show how you divide things up and plan for them. Including materials that mom or dad need to purchase will help avoid panicky trips to Office Max and yelling at each other at 9:55pm! Tip: some tools, like ToDoist, allow you to you recycle lists of things you do every week. Explore a couple of tool options and let your child/teen choose.

3. A sticky note tool like Primary Wall (review) or Lino (review) A sticky tool is a place to collect things: brainstormed ideas, sources for a research project, images, questions, links, even bits of writing. Try making a few sticky note boards as a family for recipes you’d like to try, movies you want to see, places to go on vacation, etc. Make sure you can access your board on all your devices. Now, when your child/teen has an assignment to write a paper or do a science fair project, start by making an idea board of stickies with possibilities. Use color coding to go back and sort them. Rearrange them in order of preference. Add images, especially for non-readers. You could even use stickies as a visual to-do list and drag to rearrange the steps. Ask your chlild/teen which kind of “list” he/she prefers using. By the way, there are many more sticky tools like the ones mentioned here. Lino has the advantage of being “device agnostic,” meaning there are free app versions of it for your mobile devices. Access your stickies anywhere, anytime.

4. The plus: an online “picker” like Random Name Picker (review) Sometimes it is hard to make up a young mind. Sometimes siblings fight over the stupidest things. Enter this online spinner tool you can customize with names, game choices, dinner options, or choices of which science project to do. If you need a quick, random selection, let your kids use this gadget. Yes, flipping an actual coin would also work (Oooo, try this), but doing it “high tech” is simply more fun.

September 12, 2014

5 phases of technology loss

Filed under: edtech,edtech coaching,teaching — Candace Hackett Shively @ 9:04 am

Screen Shot 2014-09-11 at 3.43.14 PMOne of the most frustrating times for any teacher is when the technology breaks down just as you finally got your students prepped and ready to accomplish a task. You were finally able to sign out the laptop cart or ipad cluster. You finally had the kids ready to roll, and  –boom– the site went down, the Internet crashed, the batteries died, or your chosen tool changed to pay-for service in the last 48 hours!

Then we go through five phases of technology loss:

1. Chaos: The time between the first student calling out, “It doesn’t work!” or “File not found!” or “I’m getting a spinny wheel!” or “It’s asking me for my credit card!” and when we regain enough class attention to ask what happened — and hear only one answer at a time.

2. Realization: The moment when we realize that this is not a temporary glitch or human error. The task at hand is dead, gone, notgunnahappentoday.

3. Improv: What we do/say to maintain some sort of facade of meaningful activity, usually getting out a book or handout. We may have enough improv experience and lesson plan recall to come up with a think-pair-share on the fly, “Talk to your neighbor and generate a list of the most important ideas you were going to include in your (fill in the name of the project here).”

4. Venting: What we do in the teachers’ room over lunch as we retell the nightmare story and vow never to try that activity again— at least not until we can get the laptops for another day.

5. Shuffling: What we do in our lesson plans to try to jam the activity in again before it becomes meaningless.

In a dream world, we could simply flipflop tomorrow’s plan with today’s at phase 3 (with no loss of time to phases 1 and 2), sign up for the laptops/ipads for tomorrow, and do the activity then. We would find an alternative for the no-longer-free tool (check on TeachersFirst!), rewrite any directions accordingly, and miraculously accomplish both tomorrow’s and today’s objectives (HA!).

But wait. There are school pictures during this period tomorrow. Start over at phase 4.

The one phase we never reach is Payback Time. This is the phase of technology loss where we somehow regain the time that has disappeared.

As an edtech coach, Payback Time is the one goodie I wish I could give out. I do my darnedest to ease the pain, but I cannot add minutes back into your class time after the day goes awry. The best I can do is to show you ways to steal a few minutes here and there over the next week  by leveraging tools well and letting the kids solve some of the problems themselves.  But I know that time will never add up to what was lost. Maybe some chocolate will help?


September 5, 2014

The technology dilemma: Connected mud?

Filed under: edtech,education,Teaching and Learning — Candace Hackett Shively @ 9:06 am

I had a short exhange with a mom this week about her school district’s major technology initiative. I pointed out that by the time her young son is in kindergarten, there will be class sets of Android tablets available for use in every K-2 classroom in her suburban district. Her response:

Don’t they get to play in dirt anymore?mud

 Reflexively, I responded that I hoped the teachers were going to have significant professional development to make effective use of the devices and not simply use them as the electronic equivalent to “seatwork,” aka “drill and kill.” But I had to stop and reflect about why I automatically respond to technology initiatives as a positive sign of a forward-thinking (and well funded) school district.

In a serendipitously related meeting with middle school MySciLife teachers, we were discussing how to integrate the online, social learning of MySciLife with hands-on science labs:

Where do labs fit? Which should come first? How do we balance the available time?

These questions are really the same, and they distill down to one omnipresent issue as technology pushes its way into classrooms, with or without the welcome of the adult stakeholders:

How can teachers and parents envision the interplay of technology-facilitated learning, hands-on experiences, and other types of learning? 

or, flipping to a skeptical voice…

Do kids really need this technology stuff in (insert grade or subject here)?

As we hear over and over, it’s not about the technology. It’s about learning, and learning happens in many, many ways. Our kiddos need multimodal approaches. Even the young parents of today remember singing out poems about prepositions, standing up and moving to remember a sequence of algebra steps, touching spelling words in the sand, drawing a mind map, and learning in many, many ways. Kids need lots of ways to learn, including dirt.

The tablets just happen to be one type of hands-on dirt. With them, kids can take a picture and write about it. Why not draw a picture with crayons and write about that? I agree. Do both. With the tablets, kids can share with a broader audience, such as posting on a blog or sharing a comic they create. Can’t they do that on paper and post it in the hallway? Sure, but Great Grandma in Vermont won’t see it. They can be real “authors” who connect and collaborate with others in classrooms far away. OK, I get it, but do they NEED that kind of connection? I believe today’s kids need to be digital authors. It is as much an everyday medium as the mud they splash in at the bus stop.

I believe they need digital mud, too.  Go back to the young mom I spoke with. Her phone is in her hand all the time. Anytime she is curious, she Googles. Needs a recipe… Google. Wants an idea for a rainy Saturday with her son… online story hour schedule at the library. We all know the cliches…. this is a “digital native,” blah blah blah.

So where does the dirt come in? Digital learning is another kind of hands-on, messy learning.  It is our job to balance it so every child — our children, our students — experiences the mess and mud of learning in the science lab, in the outdoors, on our tablets, with crayons and paper (gasp!), and in collaboration with those we can connect to only digitally. Think of it as connected mud.


August 29, 2014

A labor of love: My(insertadjectivehere)Life

Filed under: about me,deep thoughts,Digital media and learning competition,edtech,myscilife — Candace Hackett Shively @ 8:26 am

MSL logoSince April, I have been involved in a project that has stretched my thinking, my imagination, and — at times– my patience. After over three years of looking, The Source for Learning (SFL), the non-profit parent company where I work and direct TeachersFirst, has found a developer to help us create a customized platform for MySciLife®. Perhaps I should offer some background…

You remember MySciLife, the project I led to finalist status in the MacArthur Foundation’s Digital Media and Learning Competition 2010? I have occasionally written about it here. Three of us (Ollie Dreon, Louise Maine, and I) cooked up the idea one wintry afternoon in an online meeting. We hustled to become finalists. Then we did not get funded.  Since 2010,  SFL has managed sufficient funding to launch MySciLife, and we are now beginning our third year of a research pilot with teachers and students across the U.S.. For the first two years, we used a well-accepted, safe social learning platform as the “home” for MySciLife. This “home,” however, was a candidate for a full Property Brothers makeover to really suit our needs. Unfortunately, the platform was NOT designed for the kind of student roles (we call them “identities”) and interschool interactions that happen in MySciLife. Our tech-savvy teachers and their clever students were troopers at devising work-arounds to accomplish MySciLife tasks. The research came back showing that MySciLife works — and kids LOVE it.

The gist of MySciLife is that students LIVE as a science concept, creating their identities in a safe, social learning environment using status updates, interactions, and a full range of digital media within the MySciLife platform. MySciLife is personal, dynamic science learning, interaction, and assessment. Imagine living your life as a cell…(think Facebook).

We shared about MySciLife at ISTE 2013, thanks to our curriculum experts, MySciLife creative collaborators, teachers, a student, and a parent. Later that summer I ran across a relatively new tool called Mashplant Studio, the third or fourth tool I had encountered that showed promise to possibly be adapted for MySciLife. After MONTHS of discussion and negotiation… we had a deal.

Fast forward to spring and summer, 2014. Code writers are building the new platform as I write this. We have used a very messy version of it (dubbed MyMashedUpLife) for our summer Boot Camp and have 23 teachers AND their middle school science students from across the U.S. starting the school year in MySciLife right now.  We are literally laying the track in front of the train to make all the features work THIS school year instead of waiting until 2015-16.

So what have I/we learned so far? (This may have to be part 1 of many…)

  • Teachers need time for Boot Camp style PD and even more time to absorb and collaborate when they are radically changing the way they teach.
  • Students need far less time!
  • Developers/code folks re-order lists to their view of what comes first. Users have a different view, and ed tech coaches yet another. Add the visual designer, and you have cacophony!
  • No level of list making can keep track of a project perfectly.
  • Bugs reproduce.
  • Online meetings only work after you get to know the “sound” of your collaborators’ true feelings.
  • Timelines sound great, but imagination and innovation resist such limits.
  • More details and to-do items rear their ugly heads between 3 and 4 a.m. than at any other time of day or night.
  • Creating a new learning “space” is just like lesson planning. You will never get it “just right.”

Stay tuned for further updates in My(insertadjectivehere)Life. Happy Labor Day!


August 8, 2014

BYOOD, Part 2: Getting started with Mission Possible

Filed under: edtech,iPads,Teaching and Learning — Candace Hackett Shively @ 9:20 am

Screen Shot 2014-08-06 at 3.15.30 PM
Last week I posted about Beginning the Year On Our Devices, or BYOOD. Finding simple tools to accomplish this list of tasks can seem a bit intimidating if you have never taught (or learned) in a BYOD or 1:1 classroom:

  1. Find, read, and sign the school or class AUP.
  2. Find the Who am I?  tool suggestions on the class web page.
  3. Create a Who Am I? of stickies, images, or simple text notes.
  4. Bookmark your own Who Am I? board.
  5. Share the link to your Who Am I? board so classmates can see it– without knowing who made it!
  6. Correctly match at least five Who Am I boards to the classmates who made them.
  7. Save your matches in a note, word processing file, or other text FILE.
  8. Send your match file to the class OR teacher.

So here are ideas for each task:

STARTER FOR ALL STUDENTS, have them OPEN your class web page on their devices. With the very young, you can open it for them. If you need to, make a shortened url to minimize student typing errors. Have them Create a BOOKMARK or SHORTCUT to that page ON the device. With young students, walk around the room and do it for them  by using “Send to >> Home screen (iPad)” or by dragging the icon next to the address in their web browser onto the desktop to become a shortcut.  Have them try this same skill while you watch. Then delete the duplicate from the home screen or desktop since you will have made TWO of the same thing.

1A. For OLDER students, make a Google Doc of your AUP. Set sharing to “anyone with the link”  can “view.” Copy the LINK to the doc. Put that link on your class web page with the following instructions:

Go to this document [make these words a link to the AUP doc]. Read it carefully or have someone read it to you. When you are certain you understand it and all the consequences of the policies,  Write an email or MESSAGE to your teacher at [teacheremailaddress@school.org] indicating “I have read and agree to the Acceptable Use Policy as accessed [insert todays date] from this url [paste doc link here].

1B. For younger students, make a Google Doc of your AUP. Set sharing to “anyone with the link”  can “view.” Copy the LINK to the doc. Put that link on your class web page with the following instructions (not completely paperless, but…):

For homework tonight go to this document [make these words a link to the AUP doc]. Read it carefully together with your mom or dad and talk about it together. When you are certain you understand it and all the consequences of the policies,  print out a copy that you both can sign and bring it in to school tomorrow.

2. Who Am I directions (put on your class web page):

Create a sticky note board that tells some things about you but keeps your identity a secret. Include what you LIKE BEST about  school/this subject and  at least one idea about how you might use what you learn this year. Add anything you want to say about yourself and your interests, as long as you do not give away who you are! Be as creative as you wish.

2A. On your class web page for OLDER students, copy/paste the links below for reviewed tools  to use for “Who Am I?”:

Lino (and  a “how to” Lino)-  a Device Agnostic Tool!

Mural.ly

Padlet – a Device Agnostic Tool!

2B. On your class web page for younger students, make a link to Lino, and provide the information to LOG INTO a WHOLE CLASS account you have set up in advance. Make a Lino together on your projector or interactive whiteboard — with a STUDENT operating the tools — so students see how to create notes. Have them save their LINOs with a “secret” name.

3. Allow time for students to create their boards. Allow them to help each other with tech challenges and how-tos, such as installing an app version of a tool. With very young students, let them make just ONE sticky note with creative spelling!

4. Have students help each other figure out how to create BOOKMARK to their Who Am I board. Hint: if you helped younger students bookmark the class web page, at least some of them will remember how you did it!

5. Show students how to select and COPY the url to their Who AM I board (or let them figure it out if they are grades 4+). Have them SEND it to YOU or paste it onto a class wiki page. They can SEND via email, iMessage, a Google form for homework turn-in links— prepared by you ahead of time, or even a contact me link on your class web page. (Think ahead: How will you have them “turn in” links to their completed work throughout the year? Have them learn that method NOW!)

Steps 6-8 are good solve-it-yourself tasks for grades 7+ or those who are more savvy. If your students are not there yet, stop after step 5 and share the links YOURSELF on the class web page for them to discuss and “match” in small groups tomorrow.

If this sounds like a LOT… ask your ed tech coach or savvy colleague for help or work with together a colleague to create the teacher web page instructions, etc. You CAN do it — and so can your kids!! You do NOT need to personally know how to do everything on every device. Learn together. Your kids will learn more about learning by watching you learn than by listening to any directions!

July 29, 2014

BYOOD: Mission Possible for the start of school

Filed under: edtech,edtech coaching,iPads,Teaching and Learning — Candace Hackett Shively @ 8:40 am

IMG_0772BYOD (or 1:1) should really be BYOOD this time of year.

BYOOD=Beginning the Year ON Our Devices

I have thought a lot about how the first day of school can look in a BYOD (or 1:1) program. I firmly believe a BYOD (or 1:1) class should  Simplify: A handful and a bushel basket. But how do you get started? Avoid the temptation to say, “I can’t do it all at once. I’ll start with the devices on (insert date here) or tell the kids to leave them home until next week. Beginning the year on our devices establishes class rules, routines, and interactions just as you have always done on the first day.  If your school has not helped you envision your BYOD/1:1 with the kind of pragmatic, in-the-trenches ideas that teachers need, here is an idea to make the first day (or two) much more than the usual, boring, talking head teacher routine, punctuated by book-covering and PowerPoint.

We know that every BYOD/1:1 student and teacher needs to be able to (minimal list):

  • Understand and agree to the school Acceptable Use Policy for BYOD/1:1
  • Operate his/her own device (power up, open and navigate the Internet, open and close apps or programs, type, tap, drag, etc.)
  • Check battery levels and charge if needed
  • ACCESS and OPEN a link shared via class web page, Diigo, Symbaloo, or some other central link sharing. Tip: If you plan to use your web page or wiki as a hub to share assignments and work,  this should be the first link they access!
  • Create, create, create…
  • Collaborate with other students using tools from the class bushel basket.
  • Bookmark or save a link to an online project — and FIND it again quickly
  • Share a link with teacher and classmates
  • Save a file or project
  • Send a file (image, video, etc.) to a class sharing space and/or the teacher
  • (Middle school and up) Keep an organized set of project links and/or files as an ongoing “me portfolio.”

So how might we accomplish this list as part of the “getting to know you” and “class rules and expectations”?

Why not “gamify” the first day or two with a BYOOD Mission Possible list (online, of course). The kids can access and work through the Mission on their own or in collaboration. Give the Mission an incentive at the end. The “prize” can be a badge, a homework coupon, status as a tech helper, or a more teen-appropriate award such as 5 minutes of (school appropriate, creative) app time. DO NOT walk them through how-to step by step! Have kids figure out how to ACCESS  and accomplish the Mission list (ask 3 before me?). It will sound like chaos, but you and they will accomplish a very possible BYOOD mission.

Here is a simple list of the tasks you will want to include, so you can think about them.

Mission Possible: A BYOOD (Beginning the Year On Our Devices) List

  • Find, read, and sign the AUP.
  • Find the Who am I?  suggestions on the class web page.
  • Create a Who Am I? of stickies, images, or simple text notes.
  • Bookmark your own Who Am I? board.
  • Share the link to your Who Am I? board so classmates can see it– without knowing who made it!
  • Correctly match at least five Who Am I boards to the classmates who made them.
  • Save your matches in a note, word processing file, or other text FILE.
  • Send your match file to the class OR teacher.

In Part II next week I will share some possible tools to accomplish these with younger and older students. Feel free to make suggestions! Ed Tech coaches, you can start making your Mission Possible templates now to share with your teachers.


June 27, 2014

Beyond the sinkhole: Score the next web tools

Filed under: edtech,edtech coaching,teaching — Candace Hackett Shively @ 8:55 am

Web tools/apps that disappear unexpectedly can be a real challenge. Choosing their replacements can be a way to turn your frustration into something positive. Having done this scores of times, here is my advice for finding the best NEW, FREE, sink-proof replacements and grading them on a 100 point scale:scorecard

Look for FREE tools that are truly free, not free trials or free for exactly ONE project. Add 25 points for tools that allow at least 25 (or a class set) of truly FREE projects. For each additional class set, add 5 bonus points. If you are a secondary teacher with 150-200 students who are allowed to create their own accounts, award 25 points if students can create at least 10 projects per individual account.

Look for longevity. If the tool has been around without changing its terms for at least a year, it might last long enough for your kids to get several projects out of it. Allow up to 20 points for longevity.

Look for ways to keep offline copies. If the tool allows you to share via url and embed code, that’s great for allowing others to se it and for making kids care about the quality of their work because others will SEE it. If it also allows you to download an offline copy, add twenty five bonus points for the ability to KEEP the things your kids create even if the tools drops down a sinkhole.

Look for ways to direct students ONLY to the “create” area without stopping by public galleries filled with inappropriate to offensive projects made by bored 16 year olds at 3 am. SUBTRACT up to 10 points for readily accessible and potentially inappropriate galleries. If you teach elementary,  subtract up to 20 points.

Look for education-only features such as quick registration for students WITHOUT email, options to moderate student work, options to keep student work behind a password. These will allow you to stay within restrictive school policies without tricky workarounds or permissions. Add up to 10 points for teacher-friendly options.

Look for silent, how-to videos that are less than 2 minutes long. If they can demonstrate the tool in less than two minutes with only a silent screencast, even your least savvy student can handle it. More importantly, even the least savvy TEACH can handle it! Up to 10 points for a rock solid video demo and easy-to-understand interface.

Look for membership free , quick start tools. If you teach students younger than age 13 or in a school that prohibits students from creating accounts, add 10 points for membership-free use. If you have older students or freer school policies, add 1-5 points.

Look for tools that require kids to do more than a quick copy/paste and announce “I’m done!” For instance, look for tools that require them to write their own words (e.g. Fakebook) or tools where they must annotate and curate anything they collect (Diigo). Even better are tools that have them build something new from scratch, such as comic creators where they must add their own images, text, etc. to a blank set of frames. Add up to 10 points for higher level, original thinking required.

Look for tools that will allow you to adapt for different levels of students. These tools allow you to make a starter template for your students who need a little more scaffolding and also allow you to set a higher bar or greater freedom and expansiveness for your most able student. This expansiveness can include collaboration features for your kids to work with small groups or collaborate with others OUTSIDE your school. Add up to 10 points for adaptability.

Look for tools that are just plain cool. If you have never seen anything quite like it, add up to 5 points. (Sorry, virtual flash card and quiz makers, but you automatically lose out on these points!)

If you really want this process to be fun and to teach your students to be good digital consumers. have your class create their own point system to rate new tools. You could start with this one and let them add/subtract, multiply, or divide! You MIGHT want to seed the process with tools from the TeachersFirst Edge.

Happy hunting… and watch out for those sinkholes.

June 20, 2014

Down the sinkhole: Disappearing web tools/apps

Filed under: edtech,edtech coaching,teaching — Candace Hackett Shively @ 9:58 am

potholeFree web tools and apps are like sinkholes. They drop to oblivion without any warning. This week I lost one of the core tools I planned to share in my presentation at ISTE 2014 NEXT week! (At least they posted a warning that they were going to close down.) Another sinkhole, now on to the next available path.

More resistant or reluctant teachers sometimes hear stories like mine and use the precariousness of free, creative tools as an excuse to never learn any of them. I think we should use the sinkholes as opportunities to look deep and discover buried treasures.

For every web tool/app that dies, there are at least three new ones that may even have better features. And some tools, when they sense their foundations are slipping, are able to reinforce the ground around them so they will last. A select few, such as Wikispaces, Dropbox, and Evernote, seem to have selected better ground in the first place. Longevity makes them at least appear beyond the risk of sinking. But teachers are not likely to ever have a full complement of free, sink-proof tools. So we as teachers should take the moment when a tool sinks to peer into the depths of the hole — and to other ground — for new possibilities.

As we built the TeachersFirst Edge, beginning back in 2006, we included a way to categorize tools by what they can do. That’s pretty tough, since new tools always add new “types” of products they can create or combinations of features. Yes, Timemapper makes timelines, but it also creates associated maps. So we tag it into both timelines and geo/maps. We try to be there for teachers who don’t have a lot of time to replace the sunken favorite tool, ready with another option.

When the next tool dies on you, what will you do?

To take out your exasperation, feel free to collect the names of all the tools you have lost to sinkholes — kind of like carving a set of notches on your techie teacher toolbelt. It might make for some funny discussion or party games with your savvy peers: “Remember Springpad? It sprung a leak!” (That’s the one I lost this week!)

But the immediacy of teaching means you will need to shift your directions a bit and turn the kids loose to find an alternative. I don’t recommend telling students below about 10th grade to “go explore for a tool,” only because less mature kids will waste a lot of time playing and less being critical consumers of what they need. Better to give them a list of possible new tools you have had a few moments to peer into… long enough to know these tools don’t have a public gallery of examples filled with naked women, neo-Nazis, or profanities. Alternatively, you can grab a tool or two from the TeachersFirst Edge and have them “tech it out.” Ultimately, have your kids keep a running list of the tools they have found successful and even of possible substitutes if one goes the way of the sinkhole. A graffiti wall, either electronic or actual, would be great for this.

Next time: Some criteria to watch for as you peer beyond the sink hole.


June 12, 2014

ISTE: To plan or not to plan, that is the question.

Filed under: edtech,iste14,musing — Candace Hackett Shively @ 2:35 pm

will-ISTEISTE fair, so overwhelmed am I
And wond’ring as Atlanta draws us nigh…

To plan or not to plan, that is the question.

Whether ’tis nobler in the ISTE world to suffer
The slings and elbows of filled BYOD’s and Spotlights
Or to link arms against a sea on escalators
And by ignoring, defy them. To wander, to plan
No more–and thus by wand’ring seek ideas
Anew, and feel the thousand techie sparks
That ISTE’s known to light. ‘Tis a consummation
Devoutly to be wished. To learn, to steep–
To tweet–perchance to blog: ay, there’s the rub,
For in that steeping, plan-less blog what loss may be?
Could I have shuffled off and thus erased
My purpose in this techie learned place?
So I must pause. There’s the respect
That makes me yearn for sages of edtech.
For who would snap the fears and thorns of few,
As well as ISTE’s gurus — perhaps you?
The pangs of program app I must delay,
For insolence of tasks yet due TODAY.
That patient merit of unplanned bliss,
Shall en route to ISTE overwhelm
This mere munchkin in face of such uncertainty.
To grunt and sweat and plan again,
For that the dread of something I could miss,
The session skipped, and by whose words
This traveller returns, erased by will,
And makes me rather bear those things I plan
Than fly to others that I know not of?
Thus conscience does make cowards of us all,
And thus the native hue of resolution
Wins o’er the lure of serendipity.
I’ll plan and fav’ with iPad armed with app
And Evernote the sessions all the days
And steer the course of action. — Soft you now,
Oh fair edtechers! — in thy Twitter catchers
May all our ISTE be remember-ed.

For now, the plan is void, the app eschewed.
But in Atlanta, I will be prepared!

If you didn’t figure it out, this is adapted from the text at http://www.monologuearchive.com/s/shakespeare_001.html#2SjhFeODwUMci76R.99.

My apologies, Will.


Photo Credit: tonynetone via Compfight cc